
Diablo 2 Speedrun Guide — teo1904
Original guide written by teo1904 · mirrored on TheGHoppers as a community reference.
Original site teo1904 on Twitch D2 LoD leaderboards
All text and images on this page are the work of teo1904. Source: pf-mail.wixsite.com/d2speedruns
Welcome to my Speedrun Guide
Hello everyone,
I started this page because from time to time people asked me on my stream to do a guide of my own. I hope my thoughts and knowledge about the game can give you some insight. I will edit a lot of things and details as I am doing speedruns.
There are so many details that I think are important to speedrun this game fast. It is not only choosing the right skillbuild, but also: finding the right ways, avoiding dead ends…etc. So I will add as much information about the details, that I find important, to my runs.
If you have any specific questions / ideas / suggestions you should contact me. Most simple way to do that is joining my stream (twitch.tv/teo1904).
To check out the current world records on every class check out this page: speedrun.com/d2lod.
Experience
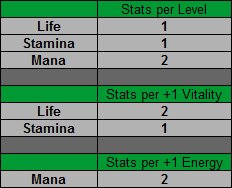
Experience is the basis on getting your lvl ups which results in +1 skillpoint and +5 statpoints each. Also every lvl adds base life, mana and stamina. The amounts differ between the chars, check out the char specifics for more information.
How to get experience:
- You get experience by killing monsters.
- There is an experience shrine which grants you +50% experience for 144 seconds. Try to use them as efficiently as possible.
- Quest rewards do not give experience.
Basic white monster

- They are the basis for any other type of monster.
- They are easy to kill but very bad for experience compared to the following monster types.
Champions

- 2–4 monsters each group — avoid them when there are only 2.
- +300% Experience.
- +2 monster lvl.
- Ghostly champions have "spectral hit" — they do elemental damage every hit. This can be very annoying on ranged monsters.
- Shamans from act 1 and 3 are the monsters you want to be champions, they give very good experience.
Bossgroups

- Boss and minions +500% Experience.
- Boss and minions +3 monster lvl.
- A random ability out of the boss modifier list.
- They are your main experience source.
The goal in every speedrun through norm is to get lvl 20 in the "Chaos Sanctuary" (act 4).
The reason behind this? You have to be lvl 20 to get the ancients quest in act 5. This is a requirement to finish the game, because you can't go on without this quest.
Lets see how we get there most efficiently:
- Until 'Andariel' — You want to focus on bossgroups here. Only kill basic monsters if you get a large group of them. Depending on the character you want to reach between 13–14.5.
- 'Blood Moor' — you want to get lvl 2 here. Zombies are the best experience in this area.
- Act 2 — 'Far Oasis' and the 'Rocky Waste' with beetles are awesome experience. But you will have to kill other normal monsters as well — just try to get little groups of monsters. lvl 17 should be your minimum goal for 'Duriel'. The Sorceress is the exception. You want to be 18 with her.
- Act 3 — The 'Flayer Jungle' is the area you want to clear for experience here to get close to 20 before 'Mephisto'. Amazon and Necro should be lvl 20 before 'Mephisto'.
Potions
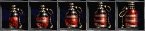
Healing Potions
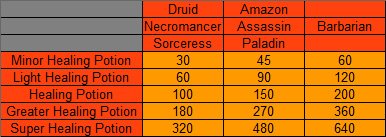
- The healing amount differs between the chars as you can see in the chart.
- These effects sometimes get doubled.
- Healing potions stack.
- When you hit 100% of your max life the rest effect of the healing potions gets lost.
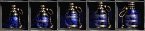
Mana Potions
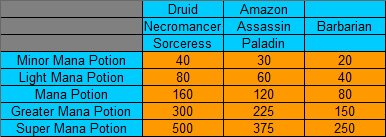
- The amount how much mana each potion regenerates differs between the chars as the chart shows.
- These effects sometimes get doubled as well.
- Mana potions stack.
- When you hit 100% of your max mana the rest effect of the mana potions gets lost.
Rejuvenation Potions
- Refills 35% Life and Mana instantly.
- Refills 100% Life and Mana instantly (full rejuvenation).
Stamina Potions
- Refills your Stamina pool.
- Antidote gives infinite Stamina for 30 seconds (stackable). Stamina is a real pain in any part of the game. Always have some with you to avoid walking.
- Antidote potion: cures poison instantly, +50 Poison Resistance and +10 max resistance for 30 seconds (stackable).
Thawing Potion
- Cures Freeze effect instantly.
- +50 Cold Resistance and +10 max resistance for 30 seconds (stackable). Always have 1–2 of those with you.


Gold Management
Gold is a very crucial aspect of any speedrun. The reasons behind that are very simple: you need Gold for buying potions, and items can be very expensive — more to that in the Items of Interest section.
So basically you want to get your gold together as efficiently as possible and as early as possible — it really starts in the Blood Moor. For the very start almost any dropped item can be used for selling to get potions. Even ~500 gold from the Blood Moor can be enough to start a run.
The list of items to get that money is quite long:
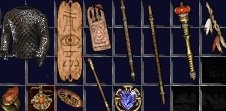
- Scepters / Wands / Short Staffs with skills ~ can give up to 5k gold.
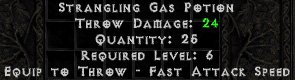
- Any throwing potions: Strangling, Fulmination, Choking, Exploding ~ depends on how much quantity they have.
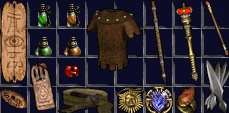
- Chipped gems ~ 250 gold each (skull gives 500).
- Throwing knifes ~ 480 gold (even with "cracked" or "low quality").
- Leather Armors ~ 240 gold.
- Jewels + Charms + Jewelry ~ depends on what's on them.
From the stuff you find in Blood Moor you just want to get some stamina and mana potions.
Later in the game the list of potentially interesting items for selling changes a bit:
- Char-specific Items with a lot of +skills (Necromancer shields / Sorc orbs / pelts) — the skills need to be high lvl to be worth it though.
- Still interesting: Scepters / Wands / Staffs with skills (the higher the skills the better).
- Jewels + Charms + Jewelry.
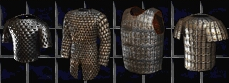
- Heavy armors: Scale Mail / Chain Mail / Splint Mail / Plate Mail.
Other stuff gets worthless:
- Light armors.
- Chipped gems.
- Throwing knifes.
The acts have a certain cap how much money you can get as a maximum from items:
- act 1 — 5000 gold
- act 2 — 10000 gold
- act 3 — 15000 gold
- act 4 — 20000 gold
- act 5 — 25000 gold
If you run out of money during the Baal waves in act 5 — just sell everything the waves drop. If even that is not enough you can think about selling your gear as well.
Sellworthy items (Blood Moor, then later act 1):
Shrines
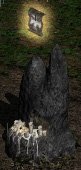
Shrines are a way to get buffs for a certain amount of time (varies between the shrines). They can improve your run a lot.
Important to know:
- Shrine times can not be stacked! If you use the same shrine twice it just restarts the timer to the full length.
- Shrines can not be stacked. You can not use different shrines together.
- Most shrine positions are fixed. If you find one close to a Waypoint you really should check it out during countess runs for example. They change between games however, so the kind of shrine might change.
- Exception: Health shrines, Mana shrines and wells are static and will always stay the same.
- Some shrines regenerate after some time.
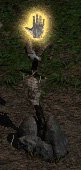
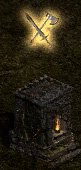
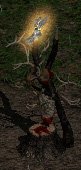
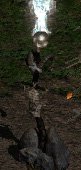
Stat-changing shrines
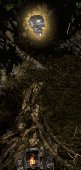
- Experience Shrine — +50% Experience for 144 seconds. Does not regenerate. Most important shrine until lvl 20.
- Skill Shrine — +2 all Skills for 96 seconds. Regenerates after 240 seconds. Very nice for any act boss fight. If close to a waypoint you can use it multiple times.
- Combat Shrine — +200% Attack Rating and +200% physical damage for 96 seconds. Regenerates after 240 seconds.
- Mana-Recharge Shrine — +400% Mana regeneration for 96 seconds. Regenerates after 240 seconds.
- Armor Shrine — +100% Defense for 96 seconds. Regenerates after 240 seconds.
- Stamina Shrine — Infinite Stamina for 192 seconds. Regenerates after 240 seconds.
Resistance shrines
- Resist Fire / Cold / Poison / Lightning Shrine — +75% of that resistance for 144 seconds. Regenerates after 240 seconds.
Regenerating shrines
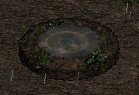
- Health Shrine — Refills 100% Life instantly. Regenerates after 96 seconds.
- Mana Shrine — Refills 100% Mana instantly. Regenerates after 96 seconds.
- Refilling Shrine — Refills 100% Life / Mana instantly. Regenerates after 96 seconds.
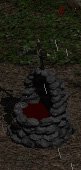
- Well — Refills 50% Life, Mana and Stamina instantly per charge. Regenerates after 30 sec (separate timers for the charges).
One-time-use shrines
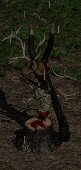
- Monster Shrine — Converts 1 random white monster to a boss. The boss won't have minions.
- Portal Shrine — Permanent Town portal to this position. If you find this before the waypoint in the Far Oasis this can be useful. TP does not stay if you save & quit.
- Gem Shrine — Either upgrades a gem from your inventory or drops a random chipped gem.
- Exploding Shrine — Drops 5–10 Exploding potions. Small explosion that does damage to enemies. Only useful as a gold source in Blood Moor.
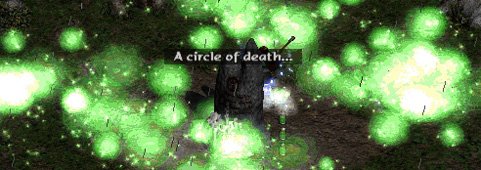
- Poison Shrine — Drops 5–10 choking potions. Large poison cloud that does damage to enemies. Can be used to kill boss groups.
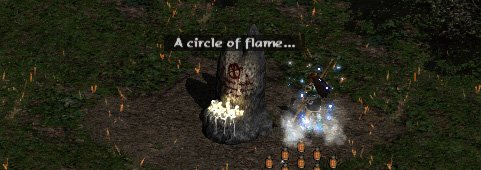
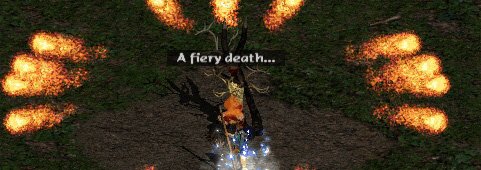
- Fire Shrine — Takes 50% of current hp from everything in range. This hits you as well.





TP-Drops
What is a TP drop?
- Drop a town portal at an objective.
- Get the next waypoint in the direction of the next objective or within the same area.
- Go back to town through the waypoint and go through your placed town portal.
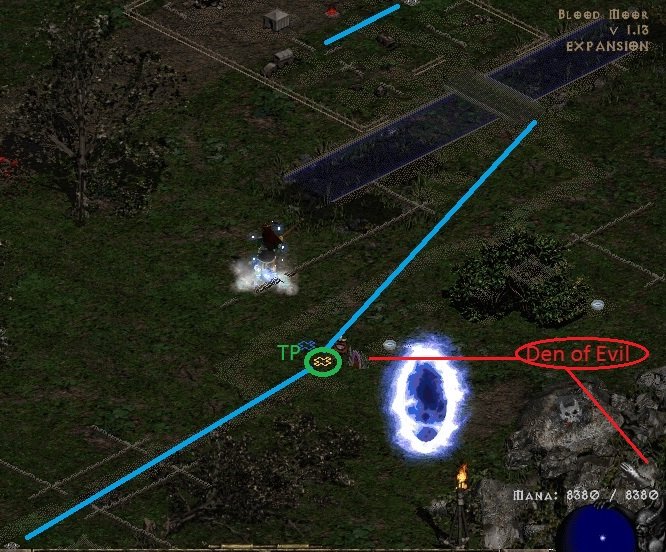
Example: Some chars have to do Den of Evil for the respec. So you start by finding the Den of Evil, drop a TP there and go on to the Cold Plains waypoint. After finding it you go to town and use the TP to get back to the Den of Evil.
This screenshot shows how it looks in practice and why it is being used: the way between town and objective is longer than the way between WP and TP in town, and the way between WP and objective is longer than the way between WP and TP in town.
Where can I use a TP drop?
Act 1:
- Den of Evil (Cold Plains waypoint).
- Forgotten Tower (Black Marsh WP) — If you find the tower before the waypoint on your first approach, drop a TP at the tower.
- Forgotten Tower (Outer Cloister WP) — If the tower is very far away from the Black Marsh, in the direction of the Cloister, you might want to do a TP drop in one of your Countess runs.
Act 2:
- Halls of the Dead (Dry Hills or Far Oasis WP) — The Far Oasis is better when you find the Far Oasis before the Dry Hills waypoint.
- Connection between Dry Hills and Far Oasis (Far Oasis WP) — If you find the entrance to the Far Oasis before Halls of the Dead or Dry Hills WP, place the TP here.
- Maggot Lair (Far Oasis or Lost City WP) — This one only applies if you came across the Dry Hills waypoint. If you find the Lost City before the WP in the Far Oasis I recommend to search for the Lost City WP. (Exception if you almost searched the whole map in the Far Oasis.)
- Connection between Far Oasis and Lost City (Lost City WP) — This one only applies if you came across the Dry Hills waypoint. When you move through the Far Oasis and find the entrance to the Lost City before either the WP or the Maggot Lair, you should use the TP here and search for the Lost City WP. Use the TP to get back to the Far Oasis later.
Act 3:
- Flayer Dungeon (WP in one of the Kurast areas or Travincal) — I use this one all the time. It is way faster to drop a TP at the Flayer Dungeon and get a later WP before going in there. Make sure you have enough mana and life potions before heading to the WP!
After that there is no good place for a TP drop anymore.
Faster Run / Walk
Faster Run / Walk is an attribute that can improve your movement speed considerably. The base speed is the same for each char:
- Walking: 6 yards / sec
- Running: 9 yards / sec
- Charging (Pala): 22 yards / sec — this is not affected by item-FRW, but skill FRW works however.
The FR/W affix can only be found on Boots and the runeword Stealth in our speedrun through norm. FR/W is an "e-function", there are no fixed caps. The walking and running speed is also affected by light, medium and heavy armor. That shouldn't be a problem in our speedruns though.

Faster Cast Rate
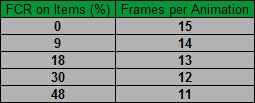
Every character needs a specific amount of base frames to cast skills. The amount of frames needed to cast a skill varies between them:
- Sorceress: 14
- Necromancer: 16
- Paladin: 16
- Druid: 15
For Amazon, Assassin and Barbarian FCR doesn't matter for speedruns. This base cast rate can be improved by items with the affix "Faster Cast Rate".
Items on which you can find this affix:
- 2-handed staffs, Wands, Orbs, Rings, Amulets, Circlets.
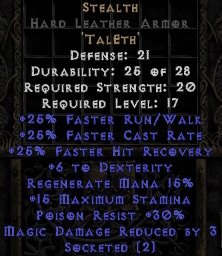
- Runeword Stealth "Tal Eth" — 25% FCR for free here.
Every char has specific breakpoints for that. Every breakpoint lowers the needed frames by one (check them out in the char specifics). However FCR does NOT reduce cooldowns from spells!

Faster Hit Recovery
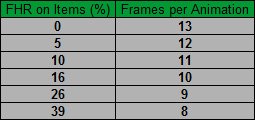
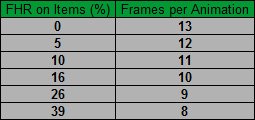
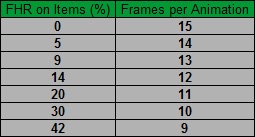
In Diablo 2 "hit recovery" is an animation that triggers when you get hit by something for 1/12th of your maximum hp. This animation takes a certain amount of frames. Every frame is roughly 0.04 seconds since Diablo 2 gives us a maximum of 25 frames/sec.
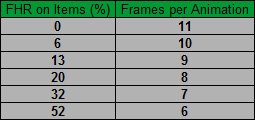
The base number of frames needed varies between the chars:
- Amazon: 11
- Assassin: 9
- Barbarian: 9
- Druid: 13
- Necromancer: 13
- Paladin: 9
- Sorceress: 15
Now the item affix "Faster Hit Recovery" comes into play.
Where can we get "Faster Hit Recovery" from?
- Runeword Stealth "Tal Eth" — We will always build this so we have 25% guaranteed.
- Boots, Belts, Shields, Helmets.
These items can be shopped from the vendors from lvl 1 and cost around 1000 Gold. Remember that potions are more important if you are low on money! Every char has certain FHR breakpoints. Every breakpoint takes off 1 frame from the hit recovery animation. Doesn't sound like much but when you get more experienced you will see that it is noticeable.

Acronyms
Since this would probably be a long list, just check out acronyms here on the Diablo Wiki. If you can't find the acronym you don't know there, please write me a message on Twitch.
Detailed Stats: Amazon
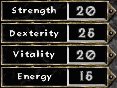
Starting Stats



Faster Hit Recovery breakpoints
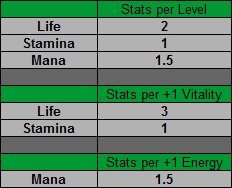
Statsgain
No skill used in speedruns requires FCR, so no list for that here.
Skill Build — Normal any%
Skill order
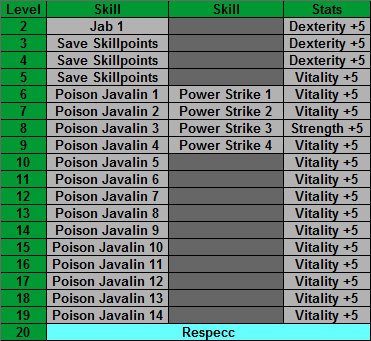
Skill explanations


- Jab: Requirement for 'Poison Javelin'.
- Power Strike: Very strong single-target skill. Mostly used in the 'Countess' runs. Also in the 'Maggot Lair' and against 'Andariel' + 'Duriel'.
- Poison Javelin: Main damage skill until lvl 20. Needs some practice to lure monsters into its path. At lvl 20 it becomes a requirement for 'Charged Strike'.
- Lightning Bolt: Requirement for 'Charged Strike' at lvl 20.
- Charged Strike: This will be our damage skill from lvl 20 'Mephisto' onwards. It is a very powerful single target attack, so don't try to fight too large groups.
After respec

Speedrun Route: Amazon
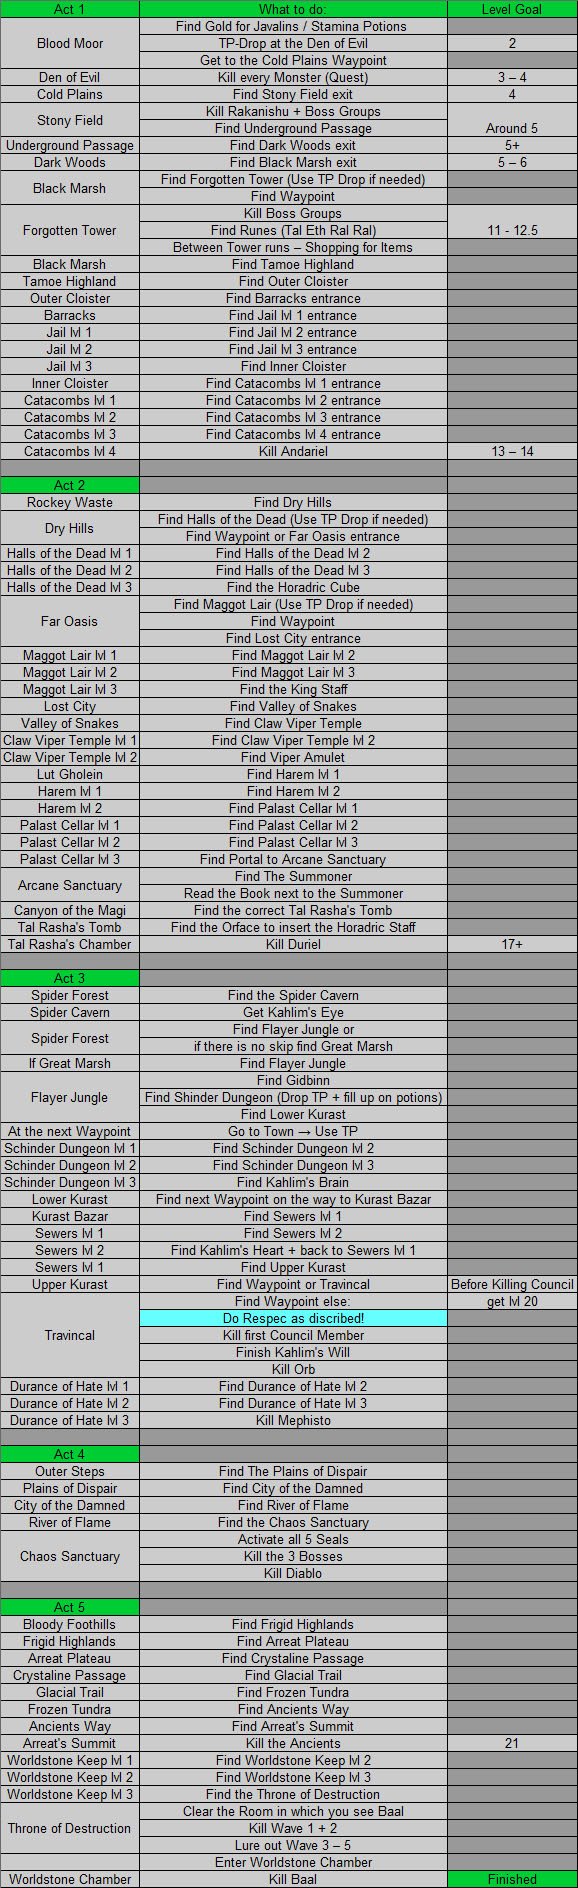
Gameplay: Amazon
Key moments (by lvl):
- Cold Plains WP — lvl 2 (make a TP drop to the 'Den of Evil' — you need to do that quest).
- Underground Passage — lvl 4–5.
- Forgotten Tower — lvl 6.
- Last Countess run — lvl 12–12.5 (Tal, Eth, 2x Ral must have dropped until that point for a good run).
- Andariel — lvl 13–14.
- Duriel — lvl 17+.
- Mephisto — lvl 20 (you want to hit lvl 20 before 'Travincal').
General gameplay:
- lvl 1–5: Well… throwing javelins is the only thing to do here.
- lvl 6–20: 'Poison Javelin's are extremely powerful. Try to lure monsters into the poison. Use 'Power Strike' only in narrow areas like 'Maggot Lair'.
- lvl 20–Baal: 'Charged Strike' has both an up- and a down-side. Down-side: no real AoE. Up-side: very strong single target. Try to "divide and conquer". Perfect scenario: only kill the quest-progress relevant monster!
Items of Interest: Amazon
Unavoidable Items
Armor: You want to get an armor with 2 open sockets. If you don't get one as a drop you can shop a Quilted Armor, Leather Armor or Hard Leather Armor at Charsi (make sure it is not a magical item!). In this armor you put the runes Tal and Eth in this order to build the runeword 'Stealth'. With +25% Faster Run/Walk, Faster Cast Rate and Faster Hit Recovery it is absolutely necessary on any character you want to speedrun!
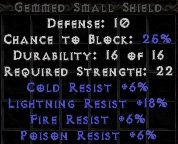
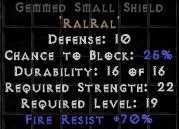
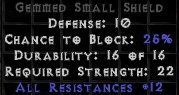
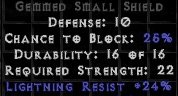
Shields: Shields are the source for our resistances. If you don't get one as a drop you can shop one or two Small Shields at Charsi. Diamonds and Topazes are nice in act 2 if you feel uncomfortable against the beetles. 2x Ral Runes are a "must have" for act 4 on the Amazon. To get maximum resistance you can combine a diamond shield with a helmet.
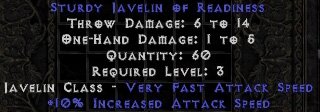
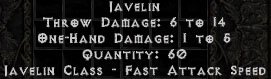
Weapon: Javelins are the only weapon you will use on the Amazon. If you don't get one as a drop you can shop javelins at Charsi. Possible additional stat (don't shop for it): +10% Increased Attack Speed — it is possible to imbue that, but boots have priority!
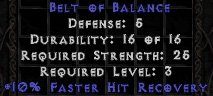
Belt: The belt slot defines how many potions you can take with you. Buy potions by spamming left-click while having no belt or a sash — it's faster. Secondarily a 3-row belt speeds up the potion shopping (fill belt, unequip, re-equip). If you don't get one as a drop you can buy a Sash or Belt from Charsi or Fara. Possible additional stats (don't shop for them): +10% / 17% Faster Hit Recovery; +5–20% Lightning-, Cold- or Fire-Resistances; 5% chance to cast level 3 'Frost Nova' when struck.
Optional Items
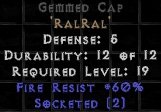
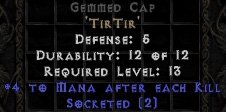
Helmet: Helmets are not a must have — they are a "just in case" item to put runes in. You want at least one helmet with 2 open sockets in case you don't get a shield. Shop a Cap or Skull Cap at Charsi. Either Tir or Ral runes (if you don't get a shield) are the options for the helmet. Possible additional stat: +10% / 17% Faster Hit Recovery (extremely rare).
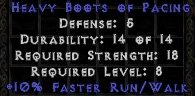
Boots: Completely optional. They can speed up a run by a lot with the right attribute. Only take Chain Boots if they have Faster Run / Walk. Possible additional stats: +10–20% Faster Run / Walk (up to +40% on unique / set boots); +10% / 17% Faster Hit Recovery; +5–20% Resistances.
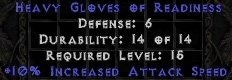
Gloves: Completely optional — you can skip over Charsi's items while you shop for the important items. Possible additional stats: +10% Increased Attack Speed; +5–20% Resistances; 5% chance to cast level 3 'Frost Nova' when struck.
Jewelry: Except for gold, rings and amulets are not really that important. Possible additional stats: +x to Life or Mana; +5–30 Resistance; +1 Mana after each kill.
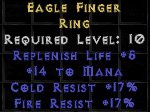
Item reference (from the original guide)















Detailed Stats: Assassin
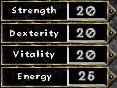
Starting Stats



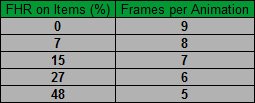
Faster Hit Recovery breakpoints
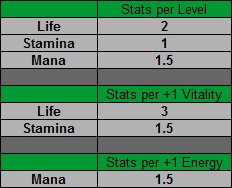
Statsgain
No skill used in speedruns requires FCR, so no list for that here.
Skill Build — Normal any%
Skill order
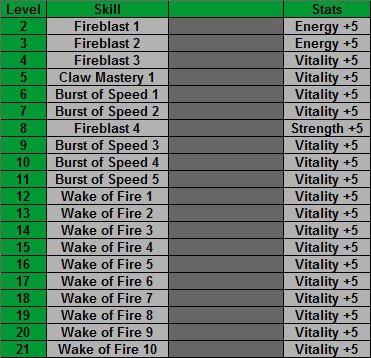
Skill explanations


- Fire Blast: Very powerful in the early game. Try to hit as many monsters as possible. It will help out after lvl 12 as well.
- Claw Mastery: Requirement for 'Burst of Speed'.
- Burst of Speed: Increases movement and attack speed (which improves trap laying) a lot. Keep it up at all times!
- Wake of Fire: One of the best early game skills. The only thing that weakens it a little is the "Next Hit Delay" — explained under Gameplay.
Speedrun Route: Assassin
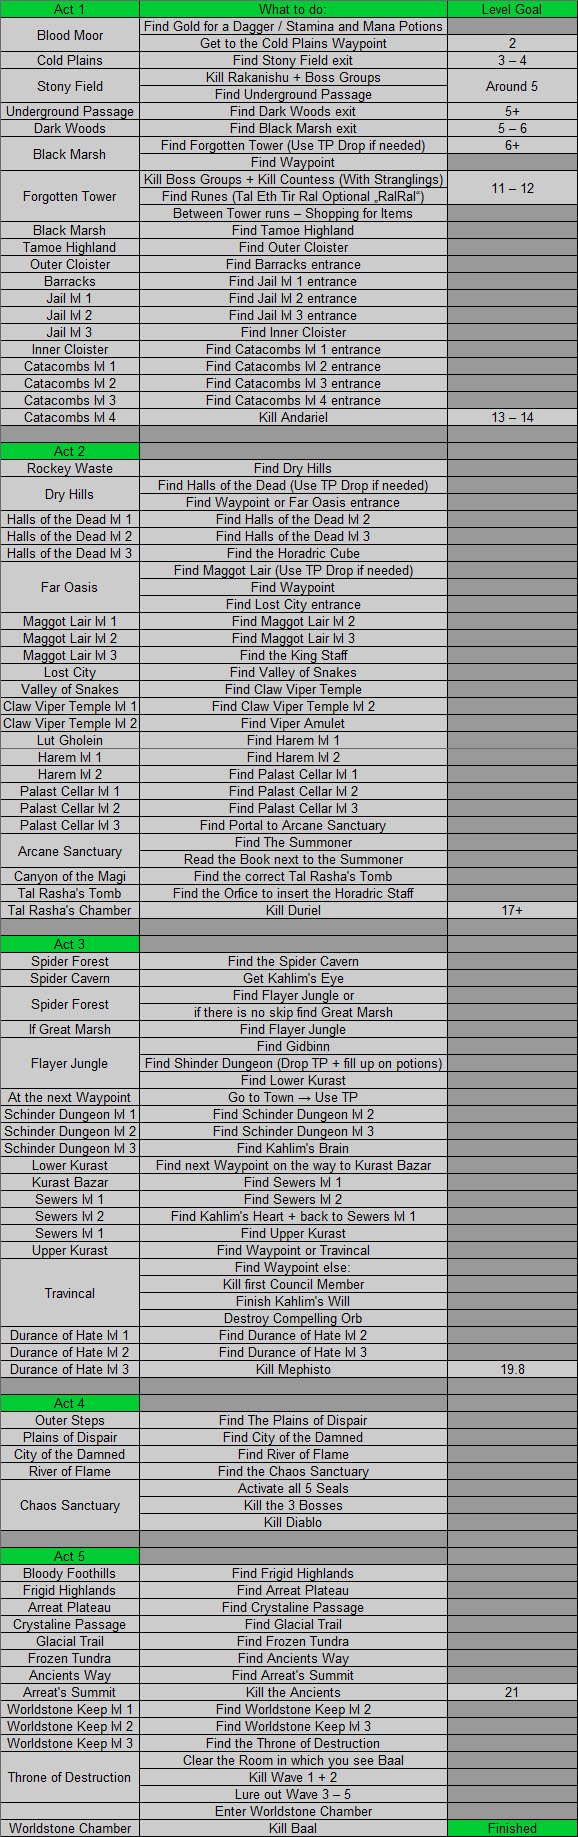
Gameplay: Assassin
Key moments (by lvl):
- Cold Plains WP — lvl 2.
- Underground Passage — lvl 4.
- Forgotten Tower — lvl 6.
- Last Countess run — lvl 10.5–11 (Tir, Ral, Tal, Eth must have dropped until that point for a good run).
- Andariel — lvl 12–13.
- Duriel — lvl 17.
- Mephisto — lvl 19.8.
- Diablo — lvl 20.
Next Hit Delay (important to know!):
NHD is an effect some skills in the game have. When a monster gets hit by one of those spells it is "immune" to other skills with this effect for a certain amount of frames. The amount of frames differs between those skills. 'Wake of Fire' is the only relevant example for speedruns. It gives the NHD effect for 4 frames (0.16 secs). To use 'Wake of Fire' as efficiently as possible in boss fights you should keep up 2 'Wakes of Fire' and throw 'Fire Blast's in between.
General gameplay:
- lvl 2–12: Try always to pull together a few monsters. The more you hit with each 'Fire Blast' the better. Against 'Countess' you want to use Strangling Potions or javelins.
- lvl 12+: Try to drop the 'Wake of Fire' traps and just run past most stuff. Only stop at bossgroups. They have a guaranteed item drop (money / gems / runes / items) and 4 potions which save shopping trips. For stronger enemies such as bossgroups / ancients: throw out 2 'Wake of Fire' traps and throw 'Fire Blast' (if possible) until the traps expire. This gives the maximum damage output on a monster.
- Chaos Sanctuary: We start with 'Infector of Souls'. Pull him towards 'Lord de Seis' while damaging him. In most cases you will kill 'Infector of Souls' and 'Lord de Seis' together. Sometimes you have to pull 'Infector of Souls' towards 'Grand Vizier of Chaos'.
- Ancients: Focus your traps on 'Madawc' until he is dead, then use the trap trick.
- Fire immunes: 'Grand Vizier of Chaos' (act 4 seal) and 'Colenzo the Annihilator' (wave 1 just before 'Baal') are the only 2 fire immunes you have to kill. Use an act 3 cold mercenary for that. Damage output between levels: lvl 19 > 17 > 18. So try to avoid a lvl 18 if you can have 17 or 19.
Items of Interest: Assassin
Unavoidable Items
Armor: An armor with 2 open sockets. If not dropped, shop a Quilted / Leather / Hard Leather Armor at Charsi (not magical!). Put the runes Tal and Eth in this order for the runeword 'Stealth' — +25% FRW / FCR / FHR, absolutely necessary on any speedrun character.
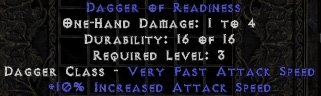
Weapons — Level 1–19: A Dagger (buy from Charsi). Possible additional stats (don't shop for them): +10% Increased Attack Speed (this could slightly change the skill order — switch Burst of Speed 2 and Fire Blast 4); +1 Mana after each Kill. Use javelins or Strangling Gas Potions to kill the 'Countess' quickly (Strangling gas potions only drop outside of town; refill the quantity by selling and rebuying them).
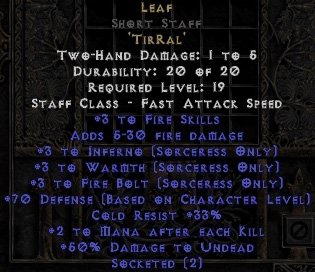
Weapons — Level 19–Baal: Shop a 2-handed short staff with 2 open sockets from Akara. For trap-laying speed it is important that it is a short staff! Put in the runes Tir and Ral for the runeword 'Leaf' — the most important attribute is the +3 to Fire Skills.
Belt: Defines how many potions you can carry. Buy potions by spamming left-click with no belt or a sash (faster). A 3-row belt speeds up potion shopping (fill, unequip, re-equip). Buy a Sash or Belt from Charsi or Fara if not dropped. Possible additional stats: +10% / 17% FHR; +5–20% Resistances; 5% chance to cast level 3 'Frost Nova' when struck.
Optional Items
Helmet: Not a must have — a "just in case" item for runes. Get one with 2 open sockets in case you find Ral runes (Cap / Skull Cap from Charsi). The only thing you put in a helmet on the Assassin are Ral runes if you have some to spare. Possible additional stat: +10% / 17% FHR (extremely rare).
Boots: Optional. Only take Chain Boots if they have Faster Run / Walk. Possible additional stats: +10–20% FRW (up to +40% on unique / set boots); +10% / 17% FHR; +5–20% Resistances.
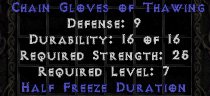
Gloves: Optional — skip over Charsi's items while shopping for the important items. Possible additional stats: +5–20% Resistances; 5% chance to cast level 3 'Frost Nova' when struck; Half Freeze Duration.
Jewelry: Except for gold, rings and amulets are not really that important. Possible additional stats: +x to Life or Mana; +5–30 Resistance; +1 Mana after each kill.
Item reference (from the original guide)
Detailed Stats: Barbarian
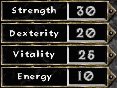
Starting Stats



Faster Hit Recovery breakpoints
Statsgain
No skill used in speedruns requires FCR, so no list for that here.
Skill Build — Normal any%
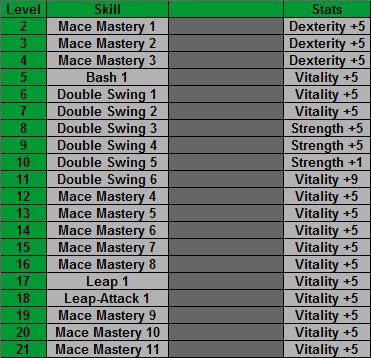
Skill order
Skill explanations


- Bash: Requirement and synergy for 'Double Swing'.
- Double Swing: This is the only attack we use offensively during the run. With the correct weapons it goes decently well.
- Mace Mastery: Increases your physical damage and attack rating. The attack rating increases your hit chance.
- Leap: Small jump to get out of tricky situations in act 2. Afterwards we go with 'Leap Attack'.
- Leap Attack: A huge jump which we can use as a 'Teleport'. It lets us jump over the river (act 3), the lava (act 4) and more.
Speedrun Route: Barbarian
Gameplay: Barbarian
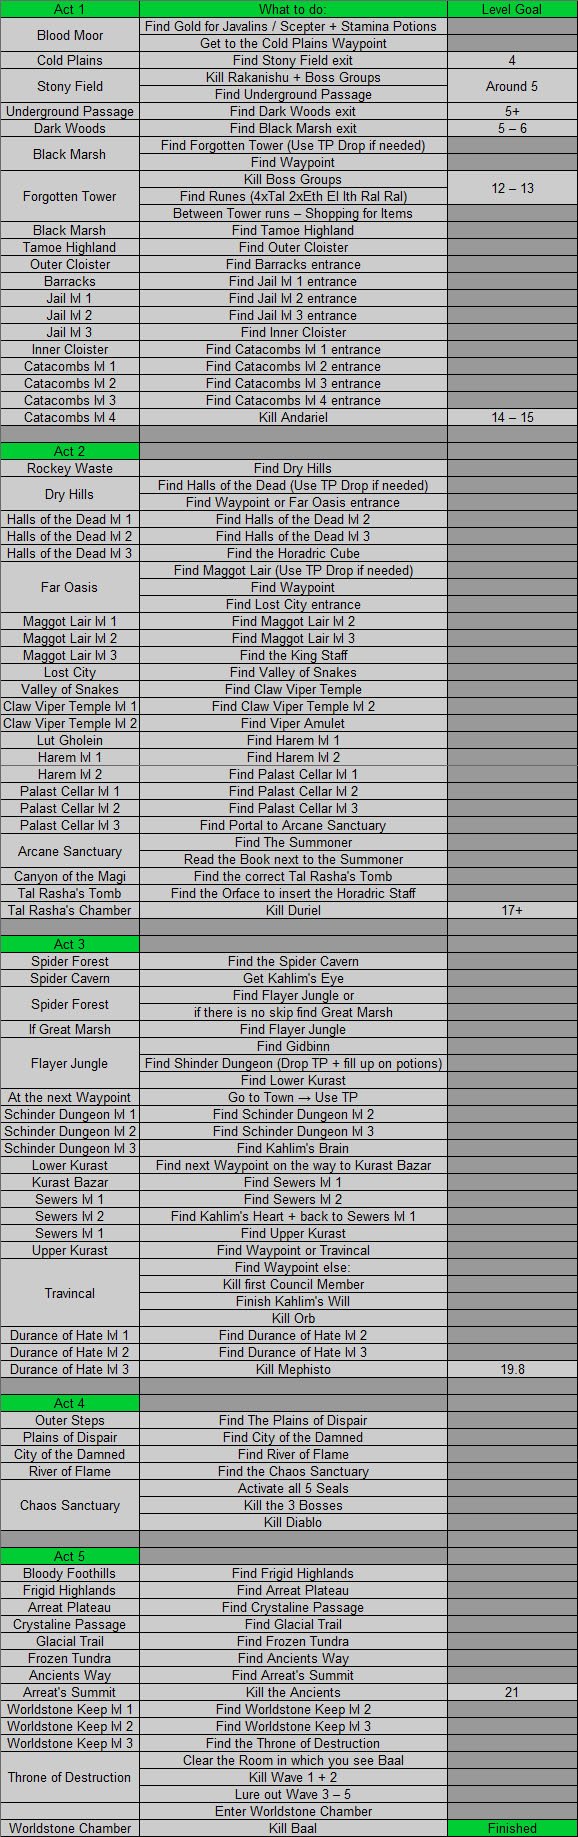
Key moments (by lvl):
- Cold Plains WP — lvl 2.
- Underground Passage — lvl 4.
- Forgotten Tower — lvl 6.
- Last Countess run — lvl 12–14 (2x Ral, 4x Tal, 2x Eth, Ith and El must have dropped until that point for a good run).
- Andariel — lvl 13–15.
- Duriel — lvl 17–18.
- Mephisto — close to lvl 20.
- Diablo — lvl 20.
General gameplay:
- Until lvl 6: Get javelins and a scepter as fast as possible. Use the javelins for bossgroups. Normal monsters should die with the scepter very easily.
- lvl 6 until end of act 1: Get a second scepter. Use Strangling Potions for AoE damage against bossgroups and finish them off with 'Double Swing'.
- End of act 1: You might want to consider doing 3–5 Andariel runs for the chance of a 'Crushing Blow' item. Talking to 'Warriv' in the same game in which you kill 'Andariel' causes her to permanently do "quest drops". This increases any drop chance by a huge amount!
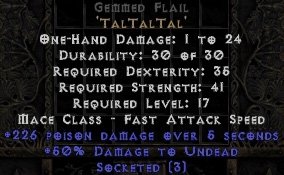
- At lvl 15: After 'Andariel' you don't really want to use Strangling Potions anymore. At lvl 15 you want to shop 2x 3-socket Flails — one for 'Malice', one for 3x Tal (can be shopped at lvl 17). This weapon combination is extremely powerful for leveling.
- If you get a 'Crushing Blow' item — only use that for act bosses (simply switch it out with the 'Malice' during boss fights).
Items of Interest: Barbarian
Unavoidable Items
Armor: An armor with 2 open sockets. If not dropped, shop a Quilted / Leather / Hard Leather Armor at Charsi (not magical!). Put the runes Tal and Eth in this order for the runeword 'Stealth' — +25% FRW / FCR / FHR, absolutely necessary on any speedrun character.
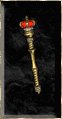
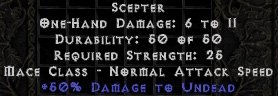
Weapons — Level 1–5: Javelins (buy from Charsi) and a Scepter (buy from Akara). Possible additional stat for the Scepter (don't shop for it): 1–2 open sockets — place chipped Emeralds or Topazes in those.
Weapons — Level 6–15: Buy a second Scepter from Akara. Get Strangling Gas Potions as drops (refill by selling and rebuying them).
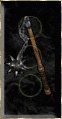
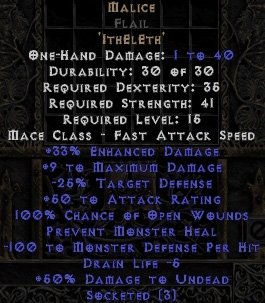
Weapons — Level 15: Buy a Flail from Fara (refresh her shop tab until you get it). Put in the runes Ith, El and Eth in this order for the runeword 'Malice'. The Malice goes into the right weapon slot!
Weapons — Level 17: Get a second mace-class weapon (Flail / Morning Star) for your left weapon slot. Put in 3 Tal runes for maximum damage. This will kill almost everything with one hit.
Helmet: Not a must have — a "just in case" item for runes. Get one with 2 open sockets for 2 Ral runes (Cap / Skull Cap / Jawbone Cap / Fanged Helm from Charsi). Possible additional stats: +10% / 17% FHR (extremely rare); +1 to 3 Mace Mastery (barb helmets only).
Belt: Defines how many potions you can carry. Buy potions by spamming left-click with no belt or a sash. A 3-row belt speeds up potion shopping. Buy a Sash or Belt from Charsi or Fara if not dropped. Possible additional stats: +10% / 17% FHR; +5–20% Resistances; 5% chance to cast level 3 'Frost Nova' when struck; Cannot Be Frozen (only Death's Disguise belt).
Optional Items
Boots: Optional. Only take Chain Boots if they have Faster Run / Walk. Possible additional stats: +10–20% FRW (up to +40% on unique / set boots); +10% / 17% FHR; +5–20% Resistances.
Gloves: Optional — skip over Charsi's items while shopping for the important items. Possible additional stats: +10% Increased Attack Speed; +5–20% Resistances; 5% chance to cast level 3 'Frost Nova' when struck; Half Freeze Duration.
Jewelry: Except for gold, rings and amulets are not really that important. Possible additional stats: +x to Life or Mana; +5 to 30 Resistance; +10 to 120 Attack Rating.
Item reference (from the original guide)


Detailed Stats: Druid
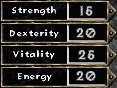
Starting Stats



Faster Hit Recovery breakpoints
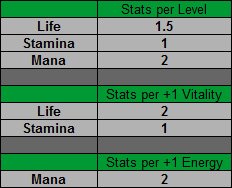
Statsgain
Faster Cast Rate breakpoints
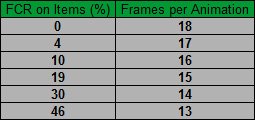
The used Druid skills have cooldowns. The cooldowns are not affected by FCR — the animation for the skills however is!
Skill Build — Normal any%
Skill order
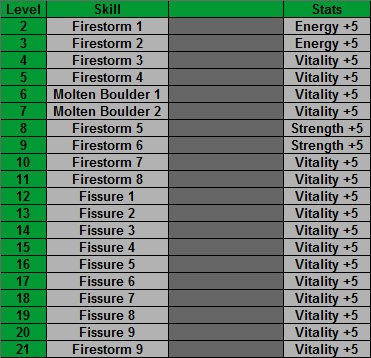
Skill explanations


- Firestorm: Very strong in the early game (before tower). Also a synergy for 'Fissure'. Very useful in narrow places + 'Diablo' fight + 'Baal' fight.
- Molten Boulder: One of the strongest skills at lvl 6. It will only be used for the 'Countess' runs.
- Fissure: Extremely powerful, especially when the enemy is moving a lot over the AoE. This makes it a little weaker against 'Diablo' and 'Baal'.
Speedrun Route: Druid
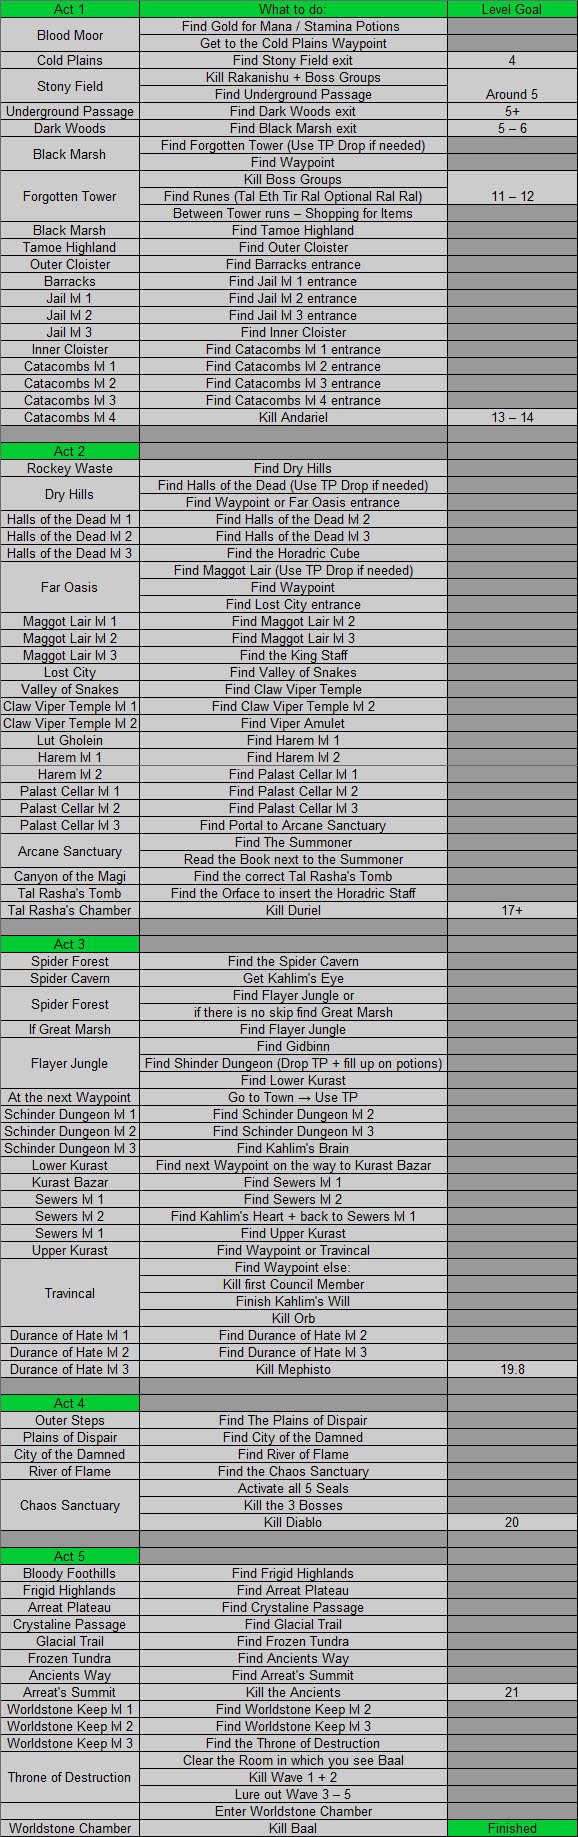
Gameplay: Druid
Key moments (by lvl):
- Cold Plains WP — lvl 2.
- Underground Passage — lvl 4.
- Forgotten Tower — lvl 6.
- Last Countess run — lvl 10.5–11 (Tir, Ral, Tal, Eth must have dropped until that point for a good run).
- Andariel — lvl 12–13.
- Duriel — lvl 17.
- Mephisto — lvl 19.8.
- Diablo — lvl 20.
General gameplay:
- lvl 2–5: Until you get to 'Molten Boulder', which I personally only use in the 'Countess' runs, 'Firestorm' is your skill. You should pull a few monsters and try to hit as many as possible.
- lvl 6–11: A lvl 2 'Molten Boulder' will destroy everything during your 'Countess' runs. It has split damage between fire and physical, so even the fire-enchanted 'Countess' goes down very fast. Unfortunately it's not a synergy for 'Fissure', so skilling past 2 is pointless. I prefer using the remaining skillpoints until lvl 12 for 'Firestorm', which has two uses: a) it's a synergy for 'Fissure', b) it will be your damage source for some areas.
- lvl 12–End: 'Fissure' is now your go-to skill for most of the run. It has a huge area of effect which makes it in some ways similar to the Assassin's WoF. In act 2 and 3 almost everything will die with 1–2 hits. Just cast and run.
Where is Firestorm better than Fissure?
- Maggot Lair: 'Firestorm' is definitely the better option here. Monsters don't have room to move except for the "bigger" rooms.
- Diablo + Baal: Against these two act bosses you should use 'Firestorm'. Both don't move much, which makes 'Fissure' a little weaker.
Fire immunes: For 'Grand Vizier of Chaos' and 'Colenzo the Annihilator' you want an act 3 cold mercenary for a fast kill. 'Molten Boulder' can provide additional damage, but it takes way too long to kill these two with only 'Molten Boulder'.
Items of Interest: Druid
Unavoidable Items
Armor: An armor with 2 open sockets. If not dropped, shop a Quilted / Leather / Hard Leather Armor at Charsi (not magical!). Put the runes Tal and Eth in this order for the runeword 'Stealth' — +25% FRW / FCR / FHR, absolutely necessary on any speedrun character.
Weapon: A 2-handed staff (Short Staff / Long Staff / Gnarled Staff / Battle Staff) with 2 open sockets, shopped from Akara or Drognan. Put in the runes Tir and Ral for the runeword 'Leaf' — the most important attribute is the +3 to Fire Skills.
Belt: Defines how many potions you can carry. Buy potions by spamming left-click with no belt or a sash. A 3-row belt speeds up potion shopping. Buy a Sash or Belt from Charsi or Fara if not dropped. Possible additional stats: +10% / 17% FHR; +5–20% Resistances; 5% chance to cast level 3 'Frost Nova' when struck.
Optional Items
Helmet: Not a must have — a "just in case" item for runes. Get one with 2 open sockets in case you find Ral runes (Cap / Skull Cap from Charsi). The only thing you put in a helmet on the Druid are Ral runes if you have some to spare. Possible additional stat: +10% / 17% FHR (extremely rare).
Boots: Optional. Only take Chain Boots if they have Faster Run / Walk. Possible additional stats: +10–20% FRW (up to +40% on unique / set boots); +10% / 17% FHR; +5–20% Resistances.
Gloves: Optional — skip over Charsi's items while shopping for the important items. Possible additional stats: +5–20% Resistances; 5% chance to cast level 3 'Frost Nova' when struck; Half Freeze Duration.
Jewelry: Except for gold, rings and amulets are not really that important. Possible additional stats: +x to Life or Mana; +5–30 Resistance; +1 Mana after each kill.
Item reference (from the original guide)
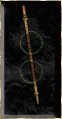
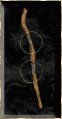
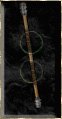
Detailed Stats: Necromancer
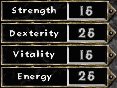
Starting Stats



Faster Hit Recovery breakpoints
Statsgain
Faster Cast Rate breakpoints
Skill Build — Normal any%
Skill order
After respec
Skill explanations


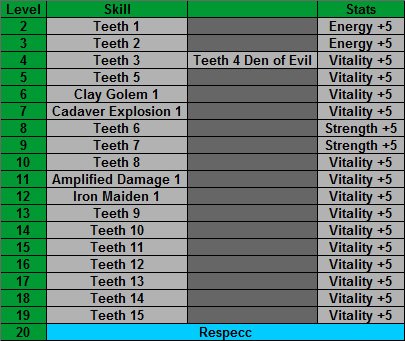
- Teeth: The only AoE skill of the Necromancer until lvl 18. It's used until lvl 20 because its AoE is better than that of 'Bone Spear'.
- Corpse Explosion: Can be a good addition to 'Teeth'. The problem is the very low AoE, which makes it very situational.
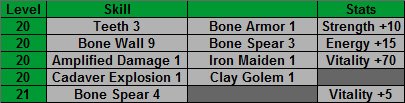
- Bone Armor: This will absorb a lot of physical damage after the respec. Not worth skilling before the respec though.
- Bone Wall: Also a skill for the respec. It's a synergy for both 'Bone Spear' and 'Bone Armor'.
- Bone Spear: We use this to increase damage against single targets after lvl 20. It is skillable at 18 but lacks the AoE during the leveling phases.
- Amplified Damage: Requirement for 'Iron Maiden'.
- Iron Maiden: In combination with 'Clay Golem' this becomes the main damage source against act bosses. Duriel dies only to this combination.
- Clay Golem: The act-boss killer in combination with 'Iron Maiden'. Can also be used as a distraction.
Speedrun Route: Necromancer
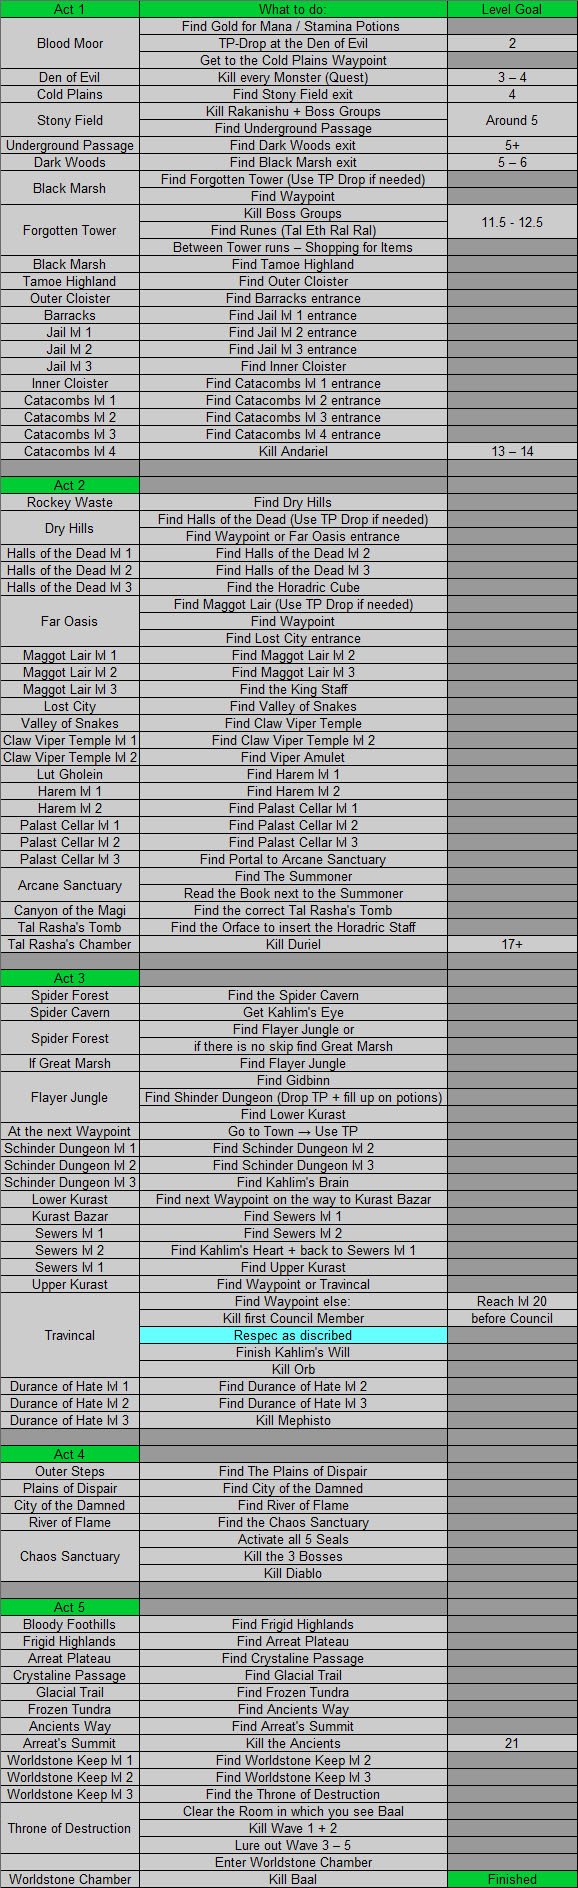
Gameplay: Necromancer
Key moments (by lvl):
- Cold Plains WP — lvl 2 (make a TP drop to the Den of Evil — you need to do that quest).
- Underground Passage — lvl 4–5.
- Forgotten Tower — lvl 6.
- Last Countess run — lvl 10.5–11 (Tal, Eth and 2x Ral must have dropped until that point for a good run).
- Andariel — lvl 12–13.
- Duriel — lvl 17.
- Before Mephisto — lvl 20.
General gameplay:
- lvl 2–5: Try to hit as many monsters as possible with 'Teeth'.
- lvl 6–11: Use Clay Golem to distract heavy-damage monsters (archers etc). In addition you can use 'Corpse Explosion' to kill boss groups quicker. Strangling Potions increase your kill speed as well.
- lvl 12–19: Lvl 12 adds 'Iron Maiden' to the mix. Keep it on act bosses at all times and keep casting the 'Clay Golem' next to them as well.
- After respec: Now we have 'Bone Spear' at our disposal. It's not the best fighting skill, so try to avoid any fight possible. In the 'Chaos Sanctuary' focus down the boss monsters from the seals. 'Bone Armor' will block a lot of physical damage, so don't be afraid of running past monsters!
Items of Interest: Necromancer
Unavoidable Items
Armor: An armor with 2 open sockets. If not dropped, shop a Quilted / Leather / Hard Leather Armor at Charsi (not magical!). Put the runes Tal and Eth in this order for the runeword 'Stealth' — +25% FRW / FCR / FHR, absolutely necessary on any speedrun character.
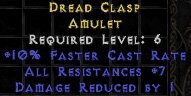
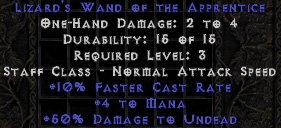
Faster Cast Rate: Apart from 'Stealth' we need either 1 or 3 items with +10% Faster Cast Rate for useful breakpoints. If you get 2 FCR jewelry items you can buy a wand with skills without FCR. Wands (Wand / Yew Wand / Bone Wand) can be shopped at Akara or Drognan. Possible additional stats on the wands (don't shop for them, too expensive): +1 to 3 Teeth; +1 to 3 Bone Spear; +1 to Poison & Bone Skills. Possible additional stats on jewelry: +x to Life / Mana; + Resistance; +1 Mana after each Kill.
Shields: Diamonds and Topazes are nice in act 2 if you feel uncomfortable against the beetles. 2x Ral Runes are a "must have" for act 4 on the Necromancer (can be shield or helmet). To get maximum resistance you can combine a diamond shield with a helmet. Shields are usually the source for our resistances — if you don't get a necromancer off-hand (Preserved Head / Zombie Head / Gargoyle Head) you can buy a Small Shield from Charsi. Possible additional stats on the necromancer heads: +1 to 3 Teeth; +1 to 3 Bone Spear; +1 to Poison & Bone Skills. If you find one of these stats, put your Ral runes into a helmet.
Helmet: Not a must have — a "just in case" item for runes. Get at least one with 2 open sockets in case you don't get a shield (Cap / Skull Cap from Charsi). Possible additional stat: +10% / 17% FHR (extremely rare).
Belt: Defines how many potions you can carry. Buy potions by spamming left-click with no belt or a sash. A 3-row belt speeds up potion shopping. Buy a Sash or Belt from Charsi or Fara if not dropped. Possible additional stats: +10% / 17% FHR; +5–20% Resistances; 5% chance to cast level 3 'Frost Nova' when struck.
Optional Items
Boots: Optional. Only take Chain Boots if they have Faster Run / Walk. Possible additional stats: +10–20% FRW (up to +40% on unique / set boots); +10% / 17% FHR; +5–20% Resistances.
Gloves: Optional — skip over Charsi's items while shopping for the important items. Possible additional stats: +5–20% Resistances; 5% chance to cast level 3 'Frost Nova' when struck; Half Freeze Duration.
Item reference (from the original guide)


Detailed Stats: Paladin
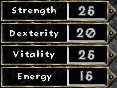
Starting Stats



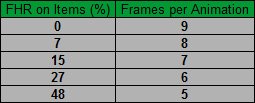
Faster Hit Recovery breakpoints
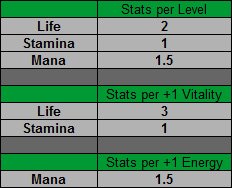
Statsgain
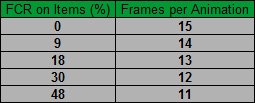
Faster Cast Rate breakpoints
Skill Build — Normal any%
Skill order
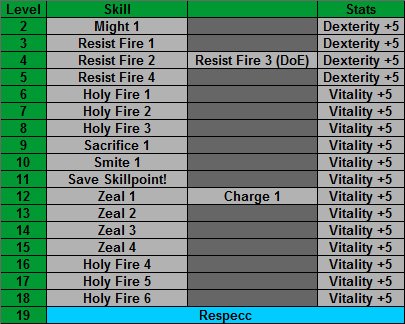
After respec
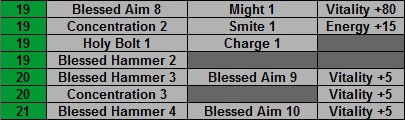
Skill explanations


- Might: Until lvl 6 the only thing that increases our damage. At lvl 6 we switch to 'Holy Fire'.
- Resist Fire: Synergy for 'Holy Fire'. Skilling it to lvl 4 gives us the highest average damage output while we use 'Holy Fire'.
- Holy Fire: The aura that gives us massive fire damage. It adds up to the physical hits. Unbeatable by any other aura until lvl 19.
- Blessed Aim: Synergy for 'Blessed Hammer'. We skill it very high because 'Vigor' wastes 3 skillpoints that don't increase our damage.
- Concentration: It only increases 'Blessed Hammer' by 50% of what the tooltip says, which is why we skill 'Blessed Aim' at lvl 21.
- Sacrifice: Requirement for 'Zeal'.
- Zeal: In combination with 'Holy Fire' this is a powerful skill. After lvl 4 it doesn't add any more hits, so no reason to use more skillpoints on it.
- Smite: Requirement for 'Charge'.
- Charge: A massive movement speed boost. Sometimes you get into a "Charge-Lock" — just switch weapons when that happens.
- Holy Bolt: Requirement for 'Blessed Hammer'.
- Blessed Hammer: Very strong AoE skill. At lvl 18 it is a little underwhelming though — check out the Paladin gameplay.
Speedrun Route: Paladin
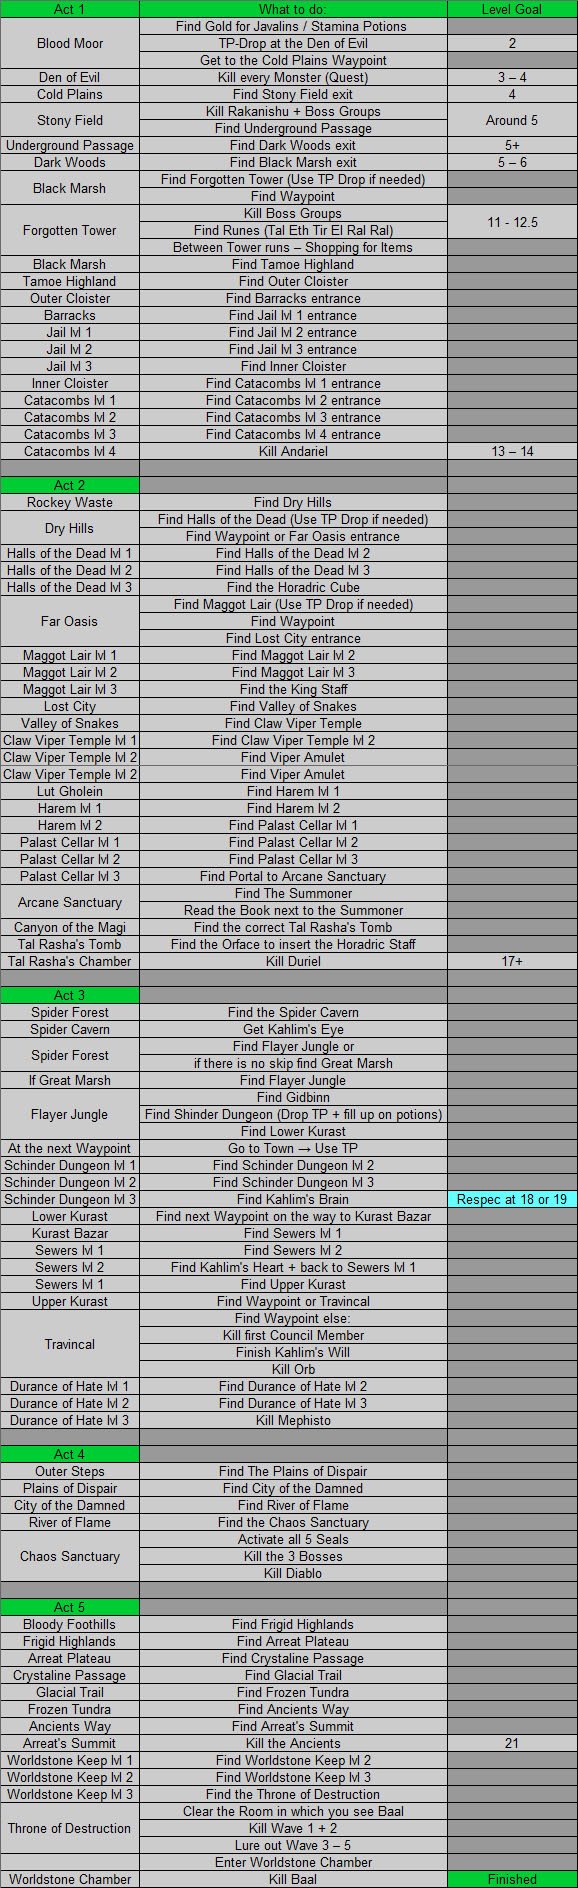
Gameplay: Paladin
Key moments (by lvl):
- Cold Plains WP — lvl 2 (make a TP drop to the Den of Evil — you need to do that quest).
- Underground Passage — lvl 4.
- Forgotten Tower — lvl 6.
- Last Countess run — lvl 11–11.5 (Tal, Eth, Tir, El and 2x Ral must have dropped until that point for a good run).
- Andariel — lvl 13.
- Duriel — lvl 17.
- Before Mephisto — lvl 20.
General gameplay:
- lvl 1–6: Use javelins to put out as much damage as possible.
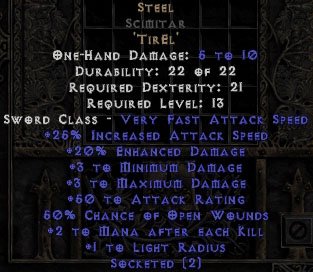
- lvl 6–12: With lvl 6 you start using Strangling Potions and a Scimitar (important). Throw out the potion and start hitting with 'Holy Fire' activated. This combination gives you AoE and high single-target damage with high attack speed.
- lvl 12–19: Pretty straight forward. Just 'Zeal' through everything like a true zealer. Use Charge to get past empty space between monsters that are worth killing. Until Andariel you can still use Strangling Potions; after that they get pointless.
- lvl 19–Baal: Instead of Zeal you now use 'Blessed Hammer' to kill stuff. This is easier since you don't have to be in melee range anymore. The area where the 'Blessed Hammer' hits evolves in a circle around you.
Items of Interest: Paladin
Unavoidable Items
Armor: An armor with 2 open sockets. If not dropped, shop a Quilted / Leather / Hard Leather Armor at Charsi (not magical!). Put the runes Tal and Eth in this order for the runeword 'Stealth' — +25% FRW / FCR / FHR, absolutely necessary on any speedrun character.
Helmet: On the Paladin you want a helmet for fire resistances (Cap / Skull Cap). Possible additional stat: +10% / 17% FHR (extremely rare).
Weapons — Level 1–5: Javelins (buy from Charsi).
Weapons — Level 6–12: A Scimitar (good attack speed is important for Holy Fire) plus Strangling Gas Potions (only drop as loot; refill by selling and rebuying).
Weapons — Level 13–19: At lvl 13 put the runeword 'Steel' "Tir El" in the Scimitar.
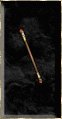
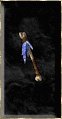
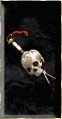
Weapons — Level 19–Baal & Faster Cast Rate: Apart from 'Stealth' we need 1 more +10% FCR piece for the 30 FCR breakpoint. Wands / scepters can be shopped at Akara or Drognan. Possible additional stats on the scepters (don't shop for them, too expensive): +1–3 Blessed Hammer; +1–3 Concentration. Possible additional stats on jewelry: +x to Life / Mana; +x% Resistance; +1 Mana after each Kill.
Belt: Defines how many potions you can carry. Buy potions by spamming left-click with no belt or a sash. A 3-row belt speeds up potion shopping. Buy a Sash or Belt from Charsi or Fara if not dropped. Possible additional stats: +10% / 17% FHR; +5–20% Resistances; 5% chance to cast level 3 'Frost Nova' when struck; Cannot Be Frozen (only Death's Disguise belt).
Optional Items
Shields: Shields are the source for our resistances. If not dropped, shop one or two Small Shields at Charsi. Paladin shields can have 3 sockets and can roll +x All Resistance (Targe / Rondache). Diamonds and Topazes are nice in act 2 vs the beetles. 2x Ral Runes make act 4 much safer. Combine a diamond shield with a helmet for maximum resistance.
Boots: Optional. Only take Chain Boots if they have Faster Run / Walk. Possible additional stats: +10–20% FRW (up to +40% on unique / set boots); +10% / 17% FHR; +5–20% Resistances.
Gloves: Optional — skip over Charsi's items while shopping for the important items. Possible additional stats: +10% Increased Attack Speed; +5–20% Resistances; 5% chance to cast level 3 'Frost Nova' when struck; Half Freeze Duration.
Item reference (from the original guide)
Detailed Stats: Sorceress
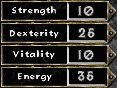
Starting Stats



Faster Hit Recovery breakpoints
Statsgain
Faster Cast Rate breakpoints
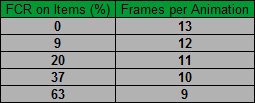
Skill Build — Normal any%
Skill order
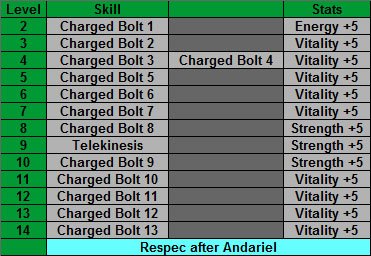
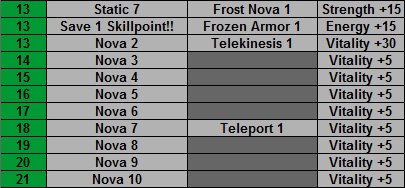
After respec
Skill explanations


- Charged Bolt: The only good offensive AoE skill until lvl 12. Unloads a number of lightning bolts — it can hit 1 monster multiple times!
- Frost Nova: Gives us a little crowd control. It slows down the monsters around you, which helps a lot for kiting.
- Telekinesis: Can activate a lot of things like waypoints, town portals and more. Saves little amounts of time when used well.
- Frozen Armor: Until 'Teleport' this skill is not that important. When you start using Teleport it can save your skin!
- Static Field: Probably the most overpowered skill in this game. It lowers the HP of monsters by 25% of their current HP.
- Nova: Against large groups of monsters this skill is amazing — everything around you gets hit. As soon as it hits lvl 2 it's extremely powerful.
- Teleport: Next to 'Static' the second skill that makes the Sorceress so fast. It takes you where your cursor is.
Speedrun Route: Sorceress
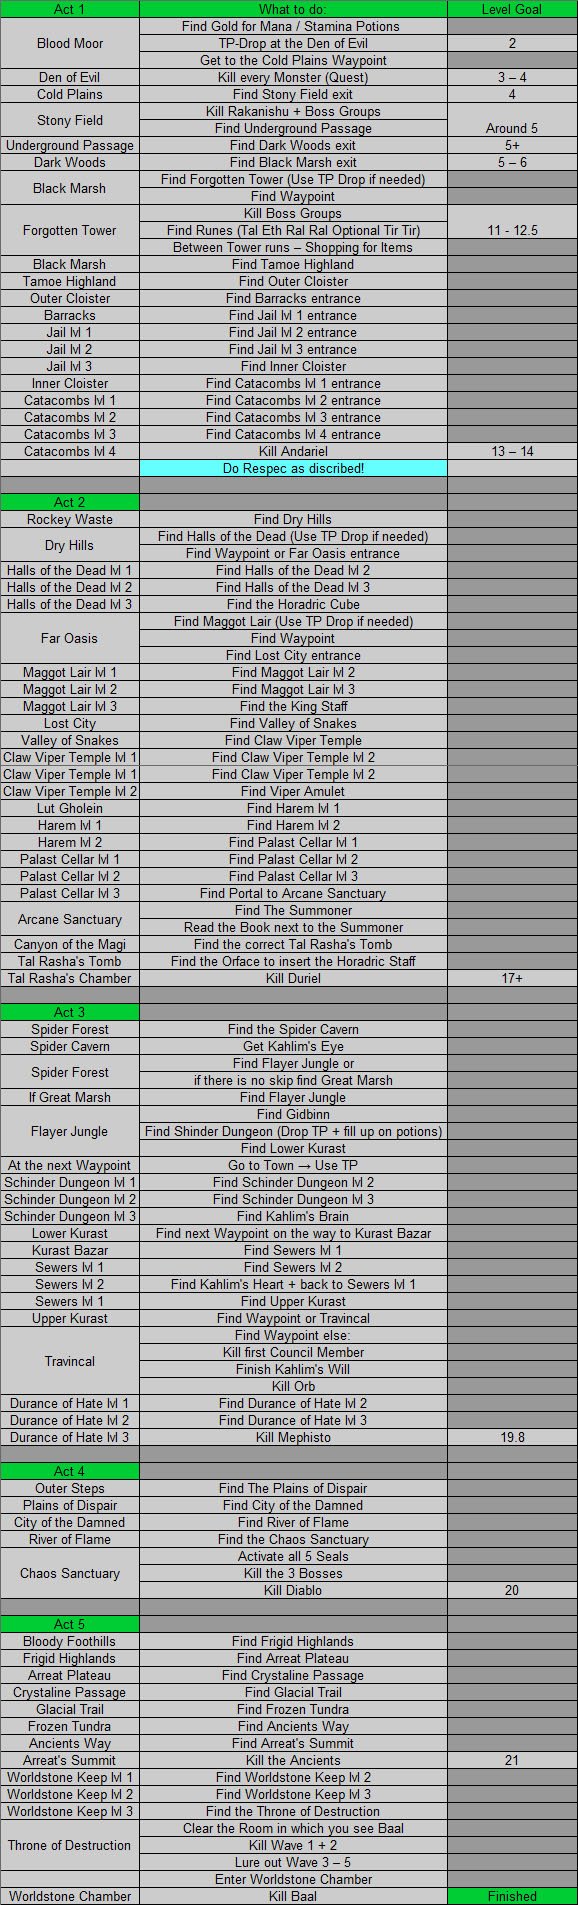
Gameplay: Sorceress
Key moments (by lvl):
- Cold Plains WP — lvl 2 (make a TP drop to the Den of Evil — you need to do that quest).
- Underground Passage — lvl 4.
- Forgotten Tower — lvl 5–6 (preferably 6).
- Last Countess run — lvl 13 (Tal, Eth, 1–2 Ral must have dropped until then).
- Andariel — lvl 14+.
- Duriel — lvl 18.
- Mephisto — lvl 19.8.
- Diablo — lvl 20.
General gameplay:
- lvl 2–13: Pretty straight forward until lvl 13. You use 'Charged Bolt' all the way. 'Frost Nova' is only for hard fights.
- lvl 11.5: You want to get lvl 11.5 on Countess and roughly 13.5 at Andariel. After Andariel you respec to Nova.
- lvl 13–18: Use 'Nova' on as many monsters as possible. 1–2 'Static Fields' can make boss groups a little faster. Against act bosses use 'Static Field' until they are at almost 0 hp.
- lvl 18–21: Get an act 2 defensive mercenary. He makes 'Teleport' a little safer to use and provides good damage against 'Grand Vizier of Chaos' when you give him a pike from the act 4 vendor.
Items of Interest: Sorceress
Unavoidable Items
Armor: An armor with 2 open sockets. If not dropped, shop a Quilted / Leather / Hard Leather Armor at Charsi (not magical!). Put the runes Tal and Eth in this order for the runeword 'Stealth' — +25% FRW / FCR / FHR, absolutely necessary on any speedrun character.
Faster Cast Rate: Apart from 'Stealth' we need 2 more +10% Faster Cast Rate pieces for the 37 FCR breakpoint. The wands (Wand / Yew Wand / Bone Wand) can be shopped at Akara or Drognan. Possible additional stats on the wands (don't shop for them, too expensive): +1–3 Charged Bolt; +1–3 Nova; +1–3 Static. Possible additional stats on jewelry (amulet / ring): +x to Life / Mana; + Resistance; +1 Mana after each Kill.
Optional Items
Shields: Shields are the source for our resistances. If not dropped, shop one or two Small Shields at Charsi. Diamonds and Topazes are nice in act 2 vs the beetles. 2x Ral Runes make act 4 much safer. Combine a diamond shield with a helmet for maximum resistance.
Helmet: Not a must have — a "just in case" item for runes. Get at least one with 2 open sockets in case you don't get a shield (Cap / Skull Cap from Charsi). Either Tir or Ral runes (if you don't get a shield) are the options for the helmet. Possible additional stat: +10% / 17% FHR (extremely rare).
Boots: Optional. Only take Chain Boots if they have Faster Run / Walk. Possible additional stats: +10–20% FRW (up to +40% on unique / set boots); +10% / 17% FHR; +5–20% Resistances.
Gloves: Optional — skip over Charsi's items while shopping for the important items. Possible additional stats: +5–20% Resistances; 5% chance to cast level 3 'Frost Nova' when struck; Half Freeze Duration.
Item reference (from the original guide)
General Questions
What does any% mean?
any% refers to games that have an in-game completion counter. For Diablo 2 that means we don't do any unnecessary quests in order to beat the game (examples: Bloodraven, Radament, etc.).
What does 100% mean?
In Diablo 2 we refer to 100% as all Quests + Cow Kings in every difficulty. Waypoints are not necessary to pick up.
What does "p1" and "p8" mean?
You can change the player settings by typing /players 1-8. By doing so every monster in the game gets stronger in terms of hitpoints, experience, damage, etc. It basically simulates a multiplayer game. Because of the experience difference they are considered different categories.
What does "px" mean?
It means that you are allowed to change the player settings at any time of the game.
Are there any major glitches / skips you can use?
There are no extreme glitches / skips in Diablo 2. There are some pathing issues that can be abused. Also you do not have to kill the waves before Baal in act 5. There is also a minor glitch with the Stealth runeword (you can get the Faster Run/Walk for a certain amount of time before lvl 17).
What programs are you using to broadcast?
I am using OBS (Open Broadcaster Software) and for the timer I use LiveSplit.
Why are you not using boots / gloves or any other "open item slot"?
In most cases we just do not find any useful items for those slots. Shopping for items to fill them up for 5–50 defense is just not worth it.
How are you finding most areas that quickly?
Most maps have patterns that you can look for — check out the map page on this matter. Also dead ends can be seen very early if you know what to look for.
Are you allowed to use respecs?
Yes we are allowed to use respecs. In most cases they increase our speed by a high amount.
How are you buying potions so quickly?
As long as you only have a 2-row belt (base row + 1 extra) you should always shop by spamming left-click (right-click has a small delay on the shopping time). As soon as you get a 3-row belt you can fill it up, then unequip the belt — every potion in the upper 2 rows will be dropped into your inventory. Equip the belt again and repeat until your inventory is full.
What is the best char for speedrunning?
The Sorceress holds the world records for both normal (1:20:39) and hell (4:59:01).
Why do you use multiple Thawing / Stamina potions?
Thawing potions give 50 Cold Resistance for 30 seconds — using multiple potions stacks the time (+30 sec each). Stamina potions give infinite Stamina for 30 seconds — using multiple potions stacks the time (+30 sec each).
Why do you drop your shield at the beginning of the run?
A shield has a very high block chance at the start of the game. Every block triggers an animation that is longer than the hit recovery animation. This basically means that every block animation will cost us time.
Normal Speedrun
What items are you trying to buy from Charsi / Akara?
We are trying to get items with open sockets from Charsi for runewords and/or the runes that were mentioned before. Akara is the source for a 10% Faster Cast Rate wand.
Why are you doing Countess runs?
We are doing Countess runs for 2 reasons: a) finding runes and b) getting experience.
What runes are you looking for in a normal speedrun?
The most important ones are "Tal Eth" for the Stealth runeword. Also interesting are Ral and Tir runes. Some chars need more runewords than that — check out the char specifics.
At what level do you finish a run?
On normal we always finish with lvl 21. Reason: Ancients require lvl 20 and give 1 lvl.
Hell Speedrun
Why do you save Deckard Cain?
We have to do some Cow runs, so we have to get to Tristram anyway. Might as well save him while we are there.
Why don't you use runewords like "Spirit", "Insight", etc?
A lot of runewords are "ladder only", which means they are not available in single player.
Why are you doing Cow runs on a hell any% speedrun?
We have to get to lvl 25 with Cow runs. They are the most effective way to do so, because between lvl 20–25 we only get a fraction of the experience from monsters that are 5+ lvls over us. This formula changes with lvl 25.
If you get a world record through the normal part, can you claim it for a normal any%?
Theoretically yes, but the problem is that we do a lot of quests in normal to make the hell parts easier. That makes it pretty much impossible to beat the record times.
What extra quests are you doing in a hell any% run?
We are doing every quest that gives us permanent benefits: Deckard Cain, Radament, Jade Figurine, Lam Esen's Tome, Izual, Shenk, the Barbarians in normal, and Anya (excluding hell quests because they take too long).
Why are you getting the quest reward from Anya that late?
The higher an item level the better the possible stats. The item level from the item Anya gives us will always be equal to our current lvl.
At what level do you finish a run?
On hell we always finish with lvl 61. Reason: Ancients (hell) require lvl 60 and give 1 lvl.